Vue (读音 /vjuː/,类似于 view) 是一套用于构建用户界面的渐进式框架。与其它大型框架不同的是,Vue 被设计为可以自底向上逐层应用。Vue 的核心库只关注视图层,不仅易于上手,还便于与第三方库或既有项目整合。另一方面,当与现代化的工具链以及各种支持类库结合使用时,Vue 也完全能够为复杂的单页应用提供驱动。
Vue实例生命周期图示

核心插件Vuex
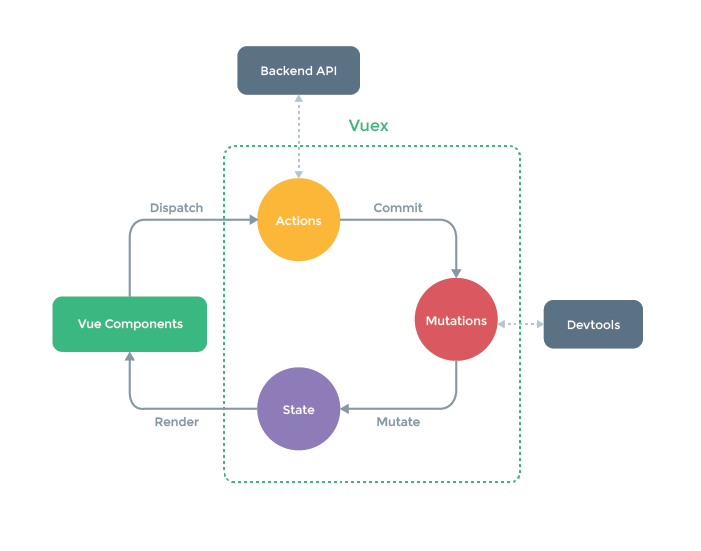
Vuex 是一个专为 Vue.js 应用程序开发的状态管理模式。它采用集中式存储管理应用的所有组件的状态,并以相应的规则保证状态以一种可预测的方式发生变化。

Vuex核心store
每一个 Vuex 应用的核心就是 store(仓库)。“store”基本上就是一个容器,它包含着你的应用中大部分的状态 (state)。Vuex 和单纯的全局对象有以下两点不同:
Vuex 的状态存储是响应式的。当 Vue 组件从 store 中读取状态的时候,若 store 中的状态发生变化,那么相应的组件也会相应地得到高效更新。
你不能直接改变 store 中的状态。改变 store 中的状态的唯一途径就是显式地提交 (commit) mutation。这样使得我们可以方便地跟踪每一个状态的变化,从而让我们能够实现一些工具帮助我们更好地了解我们的应用。
安装 Vuex 之后,让我们来创建一个 store。创建过程直截了当——仅需要提供一个初始 state 对象和一些 mutation:
1 | // 如果在模块化构建系统中,请确保在开头调用了 Vue.use(Vuex) |
现在,你可以通过 store.state 来获取状态对象,以及通过 store.commit 方法触发状态变更:
1 | store.commit('increment') |
Vuex核心概念
State
Vuex 使用单一状态树——是的,用一个对象就包含了全部的应用层级状态。至此它便作为一个“唯一数据源 (SSOT)”而存在。这也意味着,每个应用将仅仅包含一个 store 实例。单一状态树让我们能够直接地定位任一特定的状态片段,在调试的过程中也能轻易地取得整个当前应用状态的快照。
Vuex 通过 store 选项,提供了一种机制将状态从根组件“注入”到每一个子组件中(需调用 Vue.use(Vuex)):
1 | const app = new Vue({ |
通过在根实例中注册 store 选项,该 store 实例会注入到根组件下的所有子组件中,且子组件能通过 this.$store 访问到。
Getter
Vuex 允许我们在 store 中定义“getter”(可以认为是 store 的计算属性)。就像计算属性一样,getter 的返回值会根据它的依赖被缓存起来,且只有当它的依赖值发生了改变才会被重新计算。
Getter 接受 state 作为其第一个参数:
1 | const store = new Vuex.Store({ |
Getter 会暴露为 store.getters 对象,你可以以属性的形式访问这些值:
1 | store.getters.doneTodos // -> [{ id: 1, text: '...', done: true }] |
Mutation
更改 Vuex 的 store 中的状态的唯一方法是提交 mutation。Vuex 中的 mutation 非常类似于事件:每个 mutation 都有一个字符串的 事件类型 (type) 和 一个 回调函数 (handler)。这个回调函数就是我们实际进行状态更改的地方,并且它会接受 state 作为第一个参数:
1 | const store = new Vuex.Store({ |
你不能直接调用一个 mutation handler。这个选项更像是事件注册:“当触发一个类型为 increment 的 mutation 时,调用此函数。”要唤醒一个 mutation handler,你需要以相应的 type 调用 store.commit 方法:
1 | store.commit('increment') |
注意,Mutation必须是同步函数。
Action
Action 类似于 mutation,不同在于:
- Action 提交的是 mutation,而不是直接变更状态。
- Action 可以包含任意异步操作。
1 | const store = new Vuex.Store({ |
Action 通过 store.dispatch 方法触发:
1 | store.dispatch('increment') |
Module
由于使用单一状态树,应用的所有状态会集中到一个比较大的对象。当应用变得非常复杂时,store 对象就有可能变得相当臃肿。
为了解决以上问题,Vuex 允许我们将 store 分割成模块(module)。每个模块拥有自己的 state、mutation、action、getter、甚至是嵌套子模块——从上至下进行同样方式的分割:
1 | const moduleA = { |
参考链接
- Vue.js 教程,by Vue.js Homepage.
- Vuex教程,by Vue.js Homepage.
- vue 页面销毁函数_45. 聊聊 Vue 的生命周期,by atone2003.
- 使用vue-router切换组件时使组件不销毁,by 龙易安.